How to Convert PDF to Excel (The Ultimate Guide)
There are several ways you can import your PDF data into Excel. The thing is that most of them fall short, and you end up having to clean up the mess you tried to avoid in the first place.
You can opt to retype the data from PDF to Excel by hand. This is doable when you need to extract a small data set. If you’re up against a 100+ page PDF full of tables, though, the process is overwhelming and time-consuming. The same applies to copying and pasting the data into Excel.
The more obvious attempt would be to use a free online tool to convert your PDF to Excel. There are plenty of tools that can do the job. The caveat here is that most tools restrict you to convert only a limited number of files or make you wait before you can convert the document.
The best way is to use an advanced, desktop PDF to Excel converter that allows you to go beyond basic conversion tasks usually associated with PDF and Excel file formats.
Below, we’ll show you the different ways to manipulate PDF, Excel and other files formats using Able2Extract PDF Converter.
Here’s a brief overview of conversion types we’re going to cover in more detail below. Note that you can click on any of the links to jump to a specific section of the guide.
How to Quickly Convert PDF to Excel
Able2Extract Professional can convert PDF to Excel using one of the two conversion methods: automatic and custom.
The fastest way to export your PDF tables to Excel is to use the automatic PDF to Excel conversion option.
This method is best suited for basic table structures. You can convert your scanned and native PDFs to Excel in four simple steps. Here’s how:
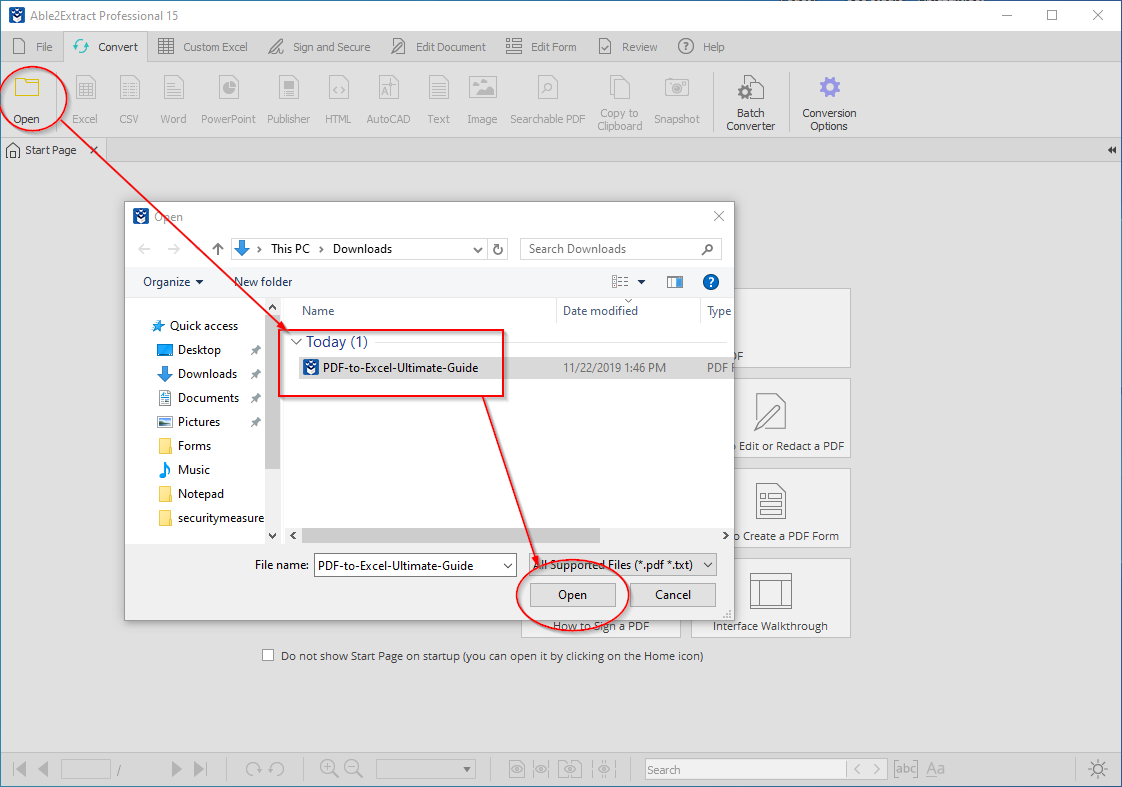
Step 1 – Open your PDF in Able2Extract Professional.
Click on the Open icon on the main toolbar and open your PDF. Alternatively, you can drag and drop your file into the Able2Extract main working area.
Step 2 – Select what you want to export to Excel.
You have multiple selection options to choose from:
- By default, the entire PDF document is selected for conversion.
- To select a specific area for conversion, simply drag-select that area with your mouse.
- Use the Select Range… option from the right-side panel to input a selection of pages for conversion (1-5, 11, 14-17, etc.).
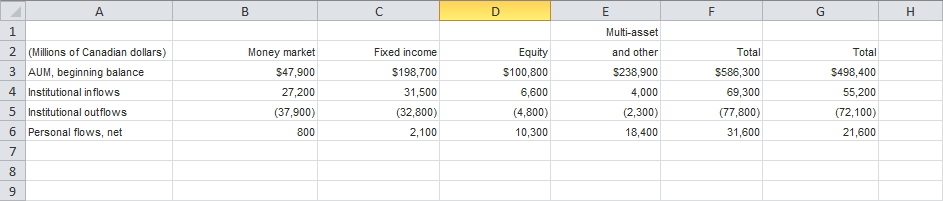
In the example below, we used drag-select option to highlight a part of a single table for conversion.

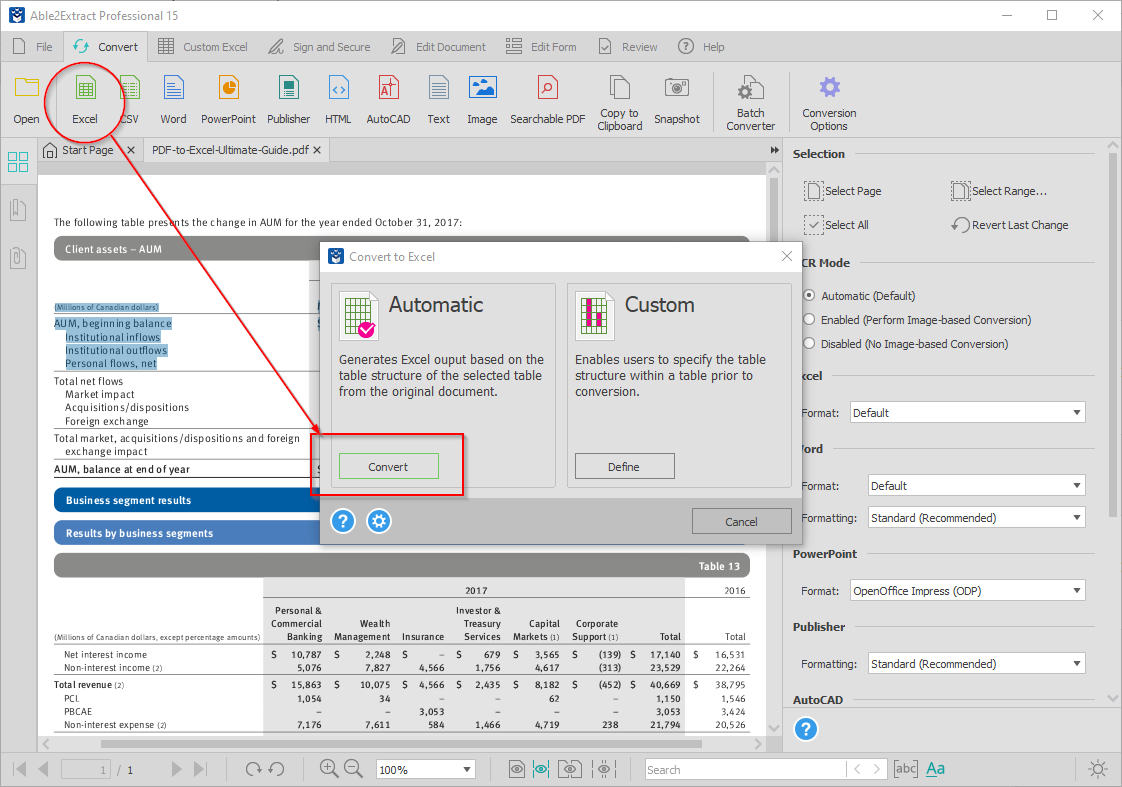
Step 3 – Convert PDF to Excel.
Click on the Microsoft Excel icon on the toolbar. A Convert to Excel dialogue will pop up. Click the green Convert button to start the conversion.
Step 4 – Save the converted Excel file.
In the Save as dialogue, specify where you want to save your Excel file and click on the Save button.
The software will automatically convert your PDF. After, the document will open in MS Excel.
Bonus Tip: Export All Tables from PDF into Excel
If you have a large PDF populated with tables enclosed by text and images, you can export only the tables (all of them) without the neighboring content.
Here’s how to export only table data from PDF:
- Open your PDF in Able2Extract Professional.
- Click on the Excel icon.
- In the Convert to Excel dialogue, click on the blue gear icon on the bottom left.
- Check the Extract Tables Only option and click OK.
- Click the Convert button.
- Save the converted Excel file.
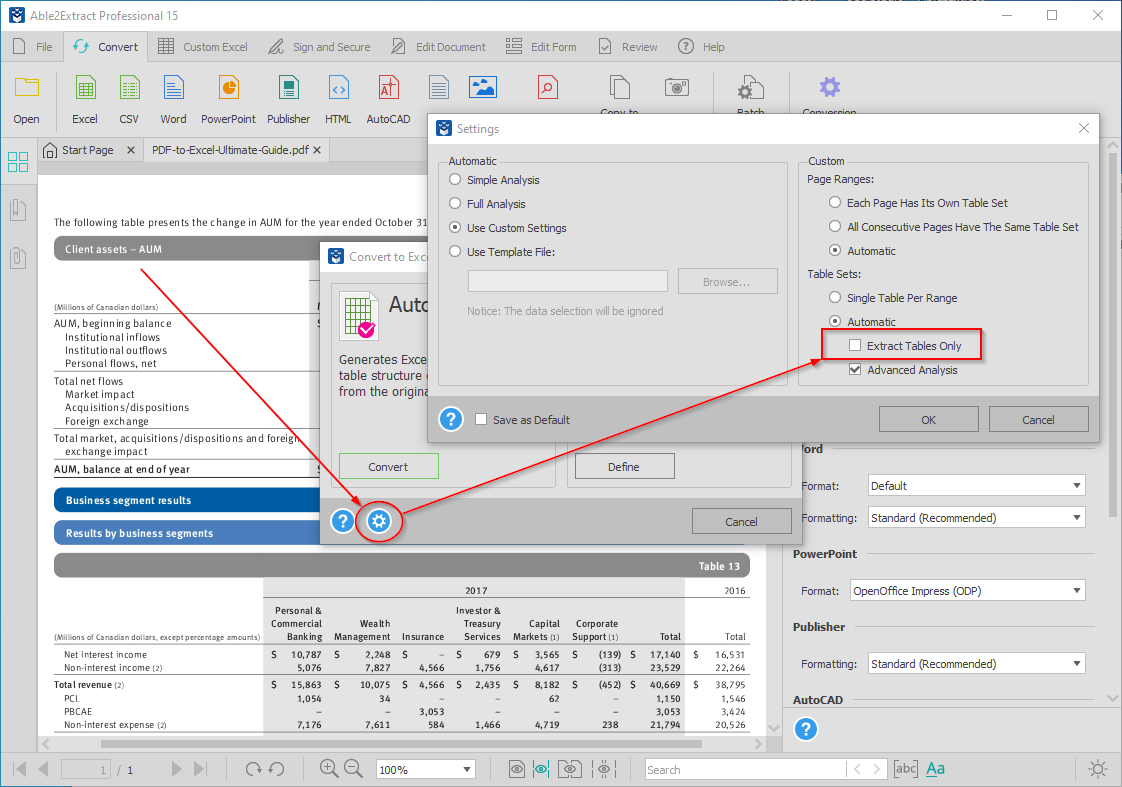
Able2Extract Professional will extract all tables from your PDF to an Excel spreadsheet. Note that by default all tables are placed in a single spreadsheet.
However, you can go so far as to take the tables from each page of your PDF document and place them in separate worksheets in Excel. To do so, go to the View menu>Conversion Options>Excel/CSV>Single Worksheet and deselect the checkbox.
How to Convert Complex PDF tables to Excel
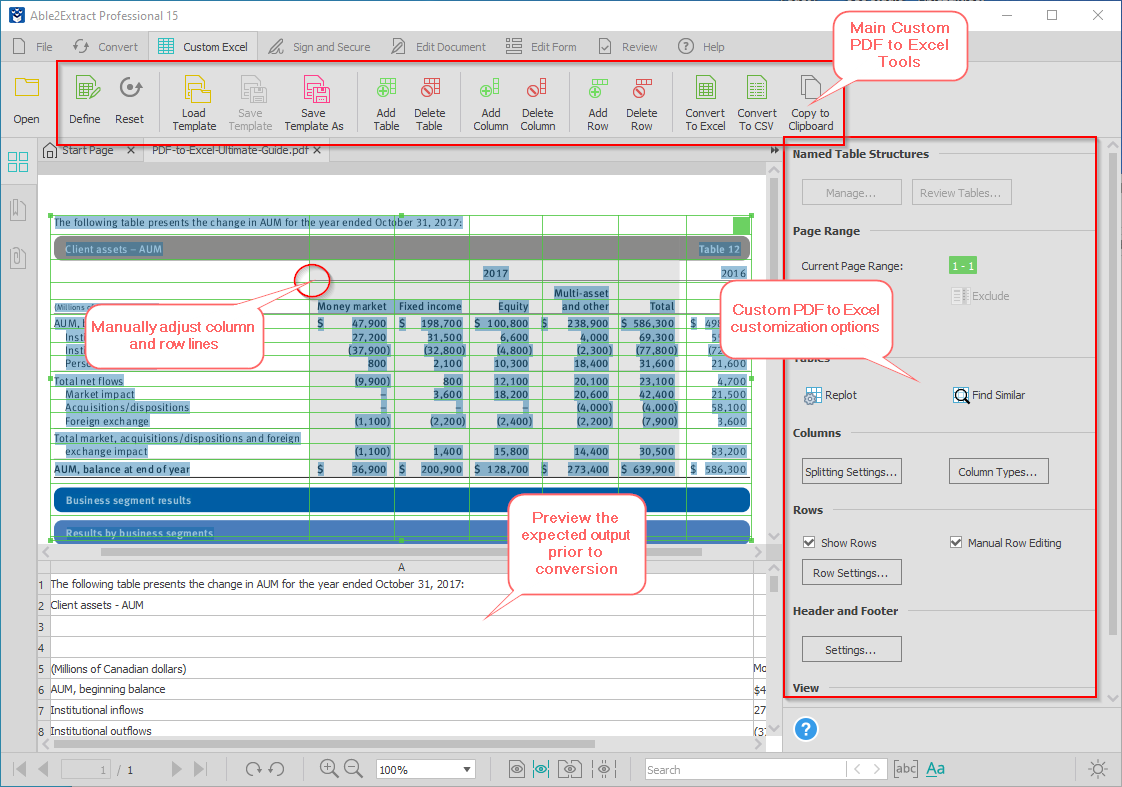
The custom PDF to Excel conversion allows you accurately extract complex tables from PDF to Excel. You can tweak the table row and column structure even before converting it to Excel, and manually arrange rows and columns to ensure you end up with an output that requires no extra work.
This way you can get full control over the conversion output and save yourself valuable time on sorting and reformatting misplaced cell data.
Here’s how to perform custom PDF to Excel conversion:
Open your PDF and click on the Custom Excel tab. You’ll be welcomed by advanced conversion tools you can use to fine-tune your Excel conversion.
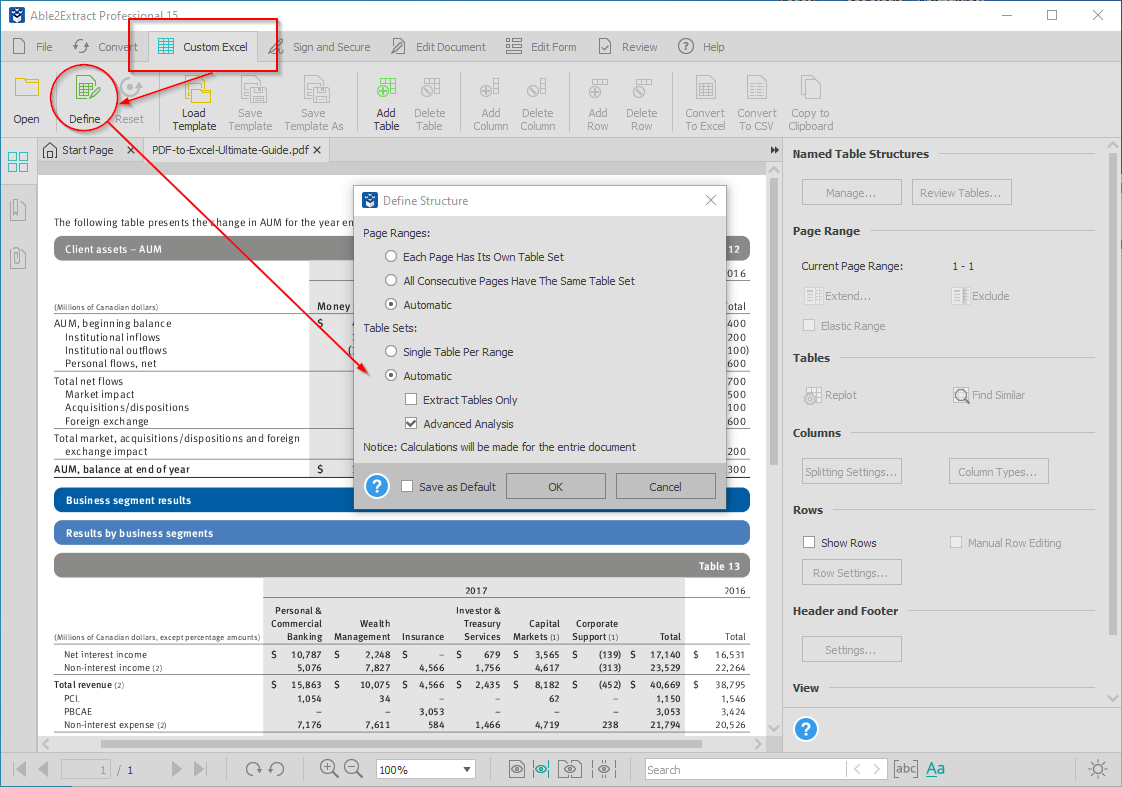
You’ll be welcomed by a custom conversion window where you can use the advanced set of tools to fine-tune your Excel conversion.
The first step is to click on the Define icon and define page ranges and table sets.
From there, you can use the appropriate tools from the custom PDF to Excel toolbar to:
- Move and adjust row and column borders by dragging the relevant lines.
- Add and erase row and column lines.
- Preview the expected output in the preview pane at the bottom.
- Add, delete, replot and find similar tables within your PDF.
- Edit header and footer, etc.
Once you’re done customizing, click the Convert to Excel to extract your PDF table data to Excel. If done correctly, you’ll end up with a fully functional spreadsheet you can work on right away.
Bonus tip: Use a Conversion Template for Recurring Documents
Able2Extract Professional allows you to set up and save your custom PDF to Excel conversion settings in a template for later use.
This is particularly useful for documents that are always formatted in the same way like PDF invoices or bank and credit card statements. Instead of adjusting the conversion every single time, you can load your conversion template and extract the data you need in seconds.
To save your custom conversion template go to Custom Excel tab>Save Template As, input the template name and save it onto your computer.
To load your custom template, open the PDF in Able2Extract Professional, then go to Custom Excel tab>Load Template, select the relevant template and load it.
From there, click the Convert to Excel button to convert your PDF to Excel.
How to Batch Convert Multiple PDFs to Excel
Besides being able to convert a single PDF file to Excel, you can also convert multiple PDFs to Excel using Able2Extract Professional thanks to the Batch conversion functionality.
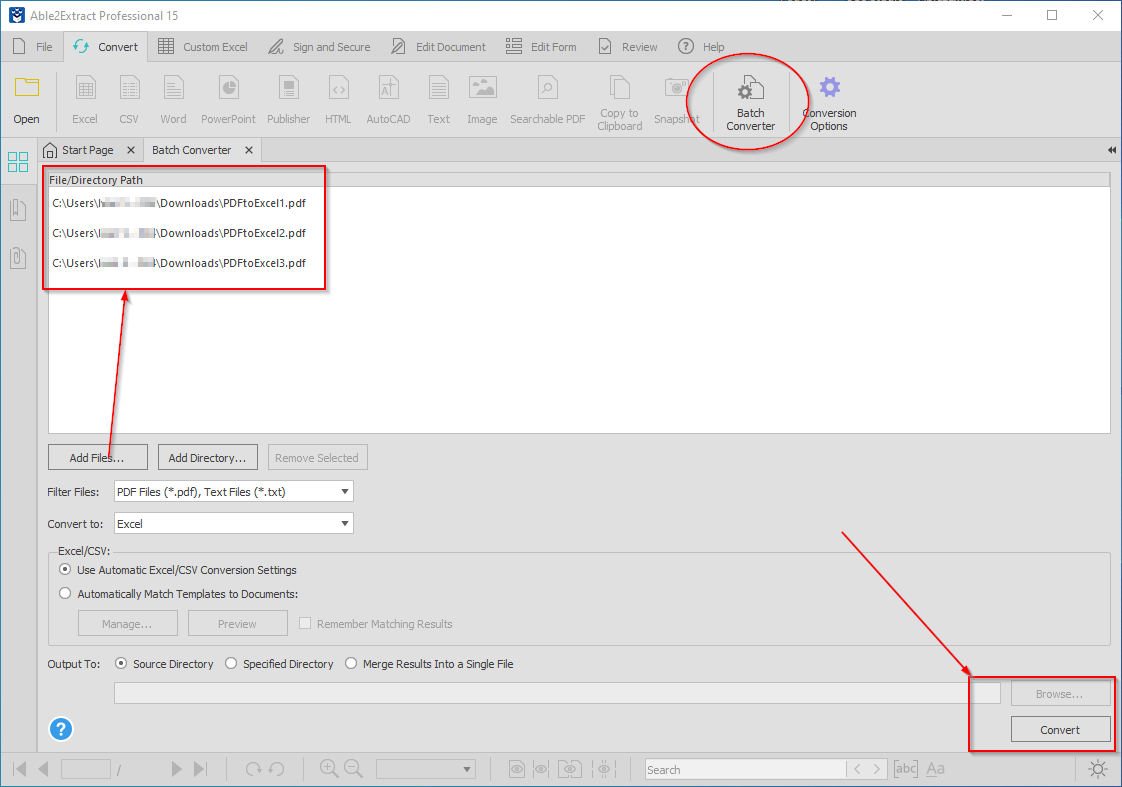
Click on the Batch Converter icon on the main toolbar to open up the Batch Conversion window. There you can:
- Input your PDF files one by one or select a specific folder that contains your PDFs.
- Choose to convert PDFs to Excel, CSV, Word or any of the other supported formats.
- Apply custom conversion templates to documents (optional).
- Select the output folder where you want to save your files.
After you load your PDFs and set desired preferences, input the required characters (case insensitive) at the bottom and click on the Convert button to start the batch processing.
Bonus Tip: Convert PDF to CSV
Able2Extract Professional also enables you to export your data from digital and scanned PDF to CSV you can easily import into Quickbooks and similar accounting software for further work and analysis.
How to Convert Word to Excel
Able2Extract Professional can also convert tables and other data from Word to Excel. In fact, it can convert any printable file format to Excel and vice-versa.
This is handy if your table data is in MS Word and you want to export it directly to Excel without having to copy and paste the data between the formats.
Here’s how to convert table data from MS Word to Excel:
- Open the Word file (or any other file type) in Able2Extract Professional.
- Select what you want to export to Excel using the selection tools on the right-side panel. By default, the entire document is selected.
- Click on the Excel icon to export tables from Word to Excel.
- Save the generated Excel file to your hard drive.
How to save Excel as PDF
The easiest way to save your Excel as a PDF is to do it directly in Microsoft Excel.
To do so go to File>Save As, choose PDF in the Save as file type section and click on the Save button.
A more beneficial way to do this is to convert your Excel file to PDF using Able2Extract Professional. This way, you can also apply a 256-bit password encryption and various file permissions to restrict printing, copying, etc.
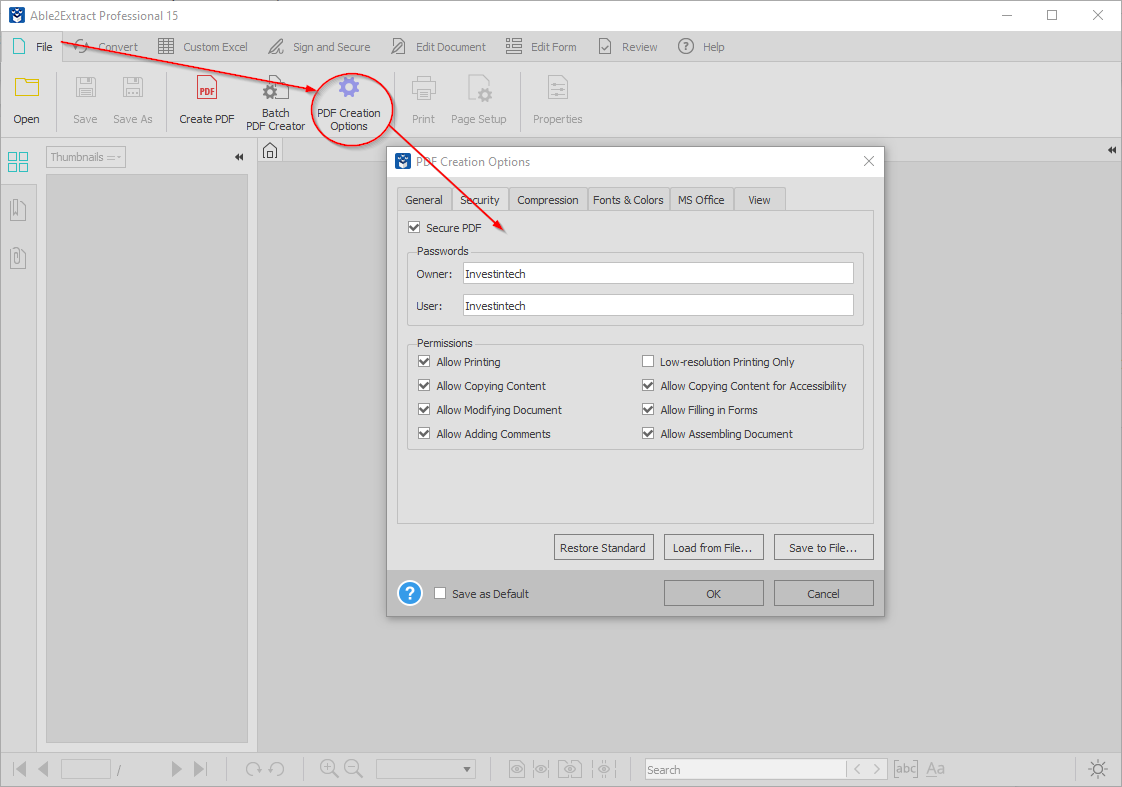
Here’s how to create a secure PDF from Excel:
- Go to File tab>PDF Creation Options
- In the PDF Creation Options window, switch to the Security tab.
- Check the Secure PDF option and input your password and file permissions preferences.
- Click on the Create PDF icon on the main toolbar.
- Locate and open the relevant Excel file.
- Save the generated PDF file to your computer by clicking the Save button.
If you don’t want to add a password or file permissions, skip the second and third step to create a regular PDF file.
Download Free Trial
Extracting PDF data to Excel shouldn’t be a headache… but it usually is. If you don’t know how to do it the right way, that is.
Using a PDF converter like Able2Extract Professional can help ease things up a bit for you and allows you to spend more time analyzing your data, instead of trying to get it out of a PDF.
You can start by downloading a free trial (available for Windows, macOS, and Linux) and seeing how it stacks up against your PDF files.